Evidence
The Evidence Locker holds the proof that your organisation does what its policies say, and a second person must approve each item before it counts towards a control.
Evidence (the proof that a control is
actually working) can be a certificate, a report, a screenshot, a log extract or
an audit letter. Each item carries a name, a type, an optional source system, an
owner and dates, and links to the controls it supports. Every new item starts as
Awaiting review. Under
four-eyes review (a second person checks the
work), it counts towards no control until someone other than the uploader
approves it.
The locker is append-only. Each stored file is hashed with SHA-256 so
tampering can be detected. No role can delete an item,
Admin included. A wrong upload
stays in the locker as Rejected, and an outdated one becomes
Superseded.
Who uses it
- Viewer: can open the locker, run the two AI briefings and export a selection, but cannot upload. The list and detail pages show only evidence the Viewer owns, so this is usually empty.
-
Contributor: can upload
evidence, link it to controls, run
AI Classifyand upload a new version of approved evidence. Sees only their own items. Cannot approve, and cannot use bulkExport. - Manager and Admin: see every item, and can approve or reject evidence that someone else uploaded. Nobody can review their own upload.
What's on this screen
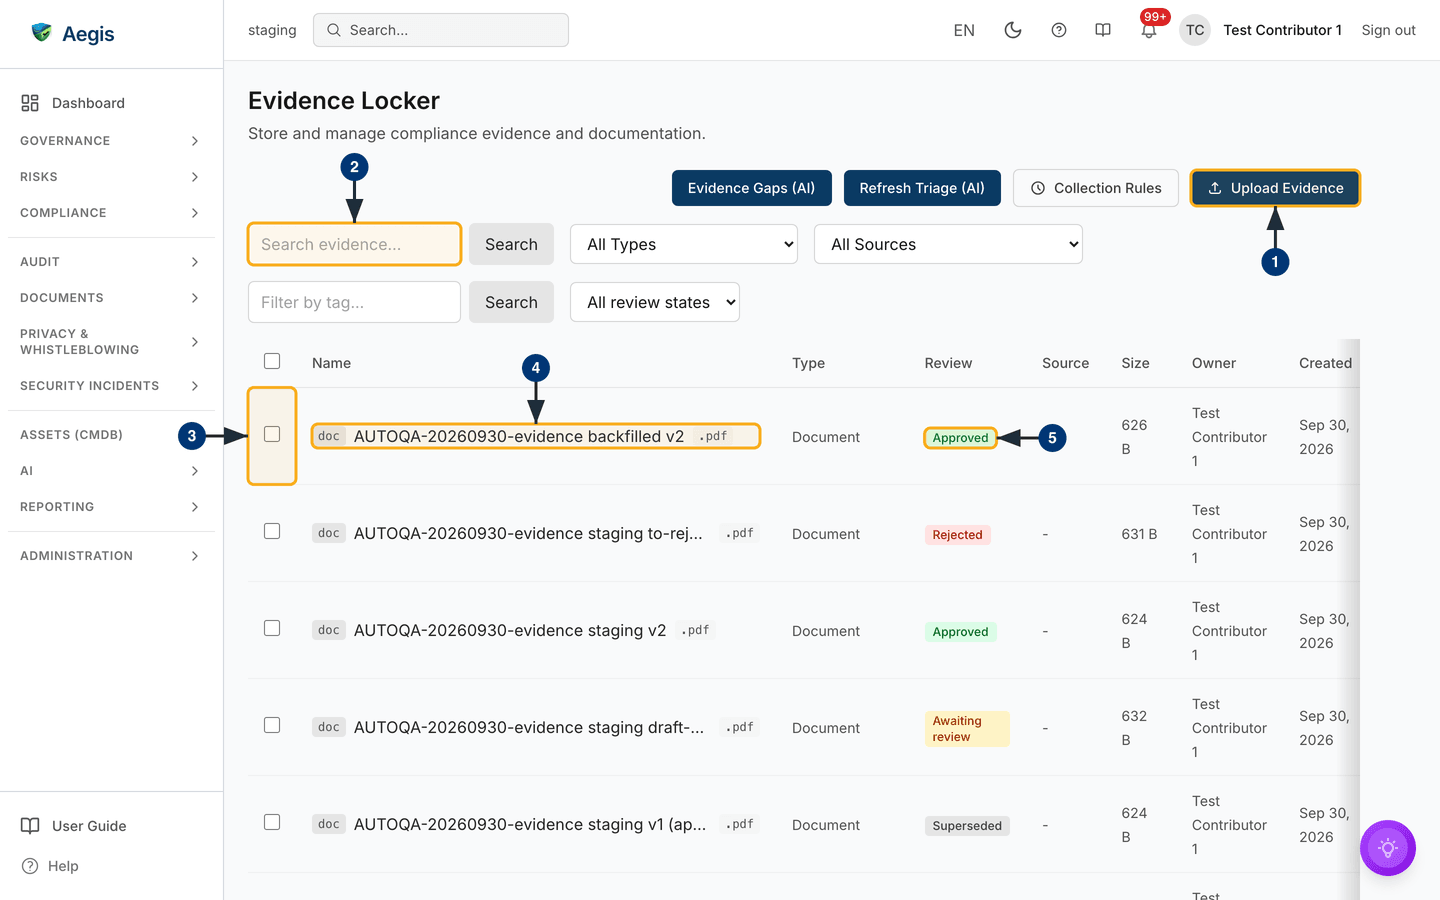
The locker is at /evidence, headed Evidence Locker.
Four actions sit in a row on the right: Evidence Gaps (AI),
Refresh Triage (AI), Collection Rules and the primary
action, Upload Evidence.
The filter bar sits below them. It has a Search evidence… box with
a Search button, plus All Types and
All Sources dropdowns. On the second line are a
Filter by tag… box with its own Search button, and the
All review states dropdown. The type and source lists are built
from the values in your own locker.
The table has a select-all checkbox, then Name, Type,
Review, Source, Size, Owner,
Created and, if you scroll right, Actions. Each name
starts with a type chip such as doc and ends with the file
extension, such as .pdf. Review shows one of four
badges: Awaiting review, Approved,
Rejected or Superseded. The captured list shows all
four. The list has no expiry column: a Valid Until date appears
only on the detail page.
Finding and opening evidence
-
To add something new, select
Upload Evidenceat the top right. TheUpload Evidencedialog opens (see the next section). -
Type a name in the
Search evidence…box. The table narrows as you type. You can narrow it further with the type, source, tag andAll review statesfilters. For example, chooseAwaiting reviewto see what is waiting for a reviewer. -
Tick a row's checkbox. A bulk bar appears above the table, showing
Link to Control,Exportor both, depending on your role. -
Select an item's name. Its detail page opens at
/evidence/{id}. -
Check the
Reviewbadge before you rely on an item. OnlyApprovedevidence counts towards a control.
Scroll the table right to reach Actions. Preview opens
the file in a panel over the list, and Download fetches the
original file. Both appear only when a file is stored.
AI Classify appears for roles that can edit evidence.
Uploading evidence
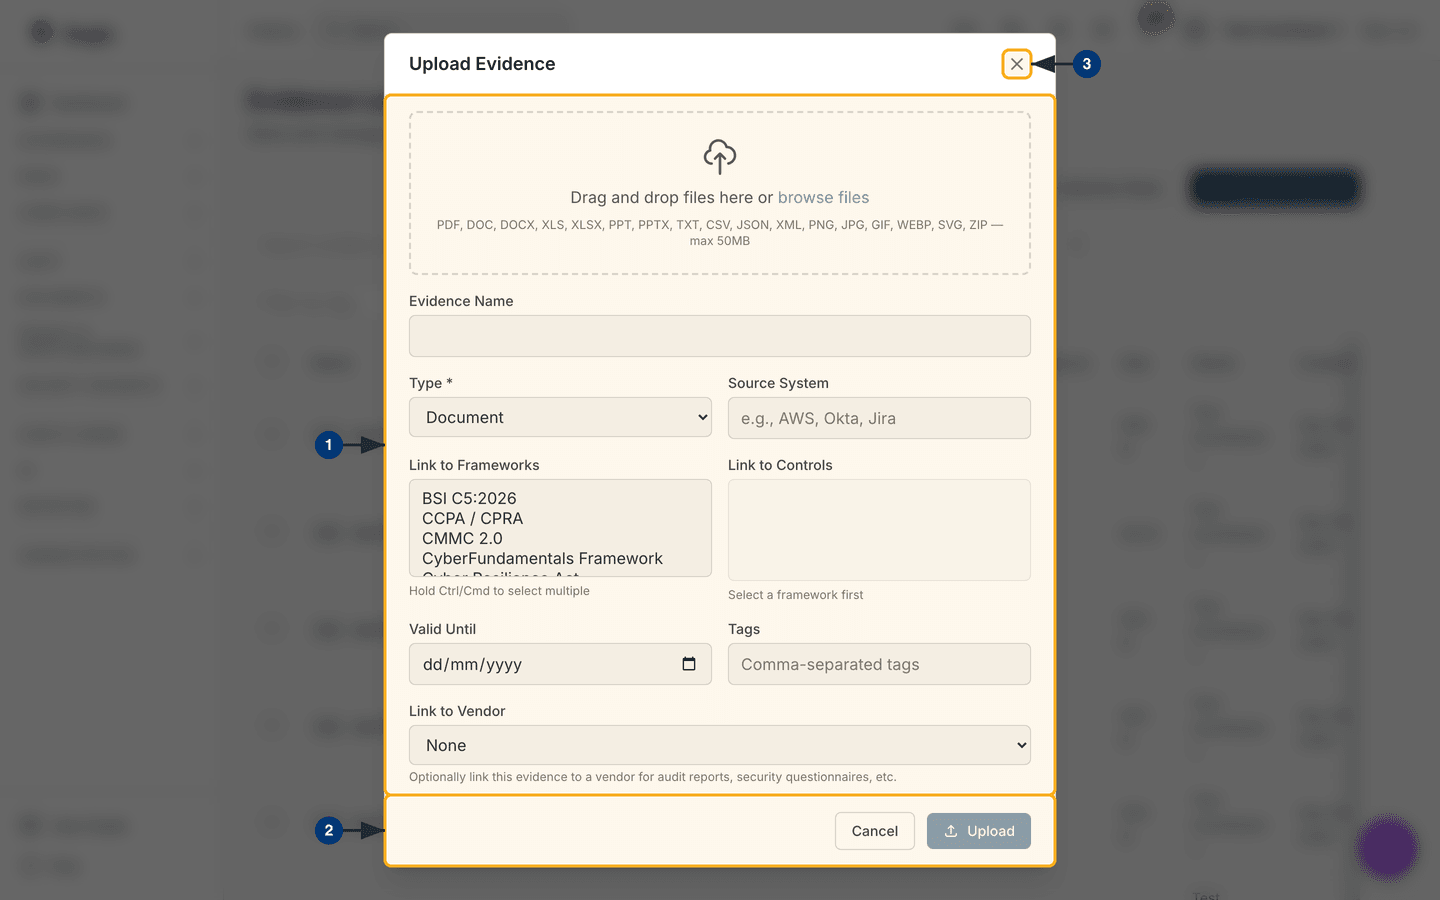
The dialog has a dashed drop zone at the top, with metadata fields below it. The
drop zone lists the accepted formats: PDF, Office documents, TXT,
CSV, JSON, XML, common image types and
ZIP. The limit is 50 MB per file, and Aegis refuses any other file.
| Field | What to enter |
|---|---|
Evidence Name |
Filled in from the first file's name, and you can edit it. It applies only to a single-file upload. With several files, each item takes its own file name. |
Type * |
Required. The dialog opens on Document. |
Source System |
Where the file came from, such as AWS,
Okta or Jira.
|
Link to Frameworks |
Hold Ctrl or Cmd to choose several. Until you choose one,
Link to Controls reads
Select a framework first.
|
Link to Controls |
The controls this evidence supports, from the frameworks you chose. |
Valid Until, Tags |
The expiry date, and tags separated by commas. |
Link to Vendor |
Optional. Use it for supplier audit reports or questionnaires. The
default is
None.
|
-
Drag files onto the drop zone, or select
browse files. Each file appears under the zone with a control to remove it. Then fill in the fields described above. -
Select
Upload. It stays greyed out untilEvidence Namehas a value, as in the capture, where no file has been added yet. Each file uploads in turn with its own progress indicator. The dialog then closes, and the new rows appear with anAwaiting reviewbadge. -
To stop without saving anything, select
×at the top right orCancel.
You can submit the form without a file, once you have typed an
Evidence Name. This records that an artefact exists in another
system without copying it into Aegis. The item then has no
Preview or Download action.
Reviewing evidence (four-eyes)
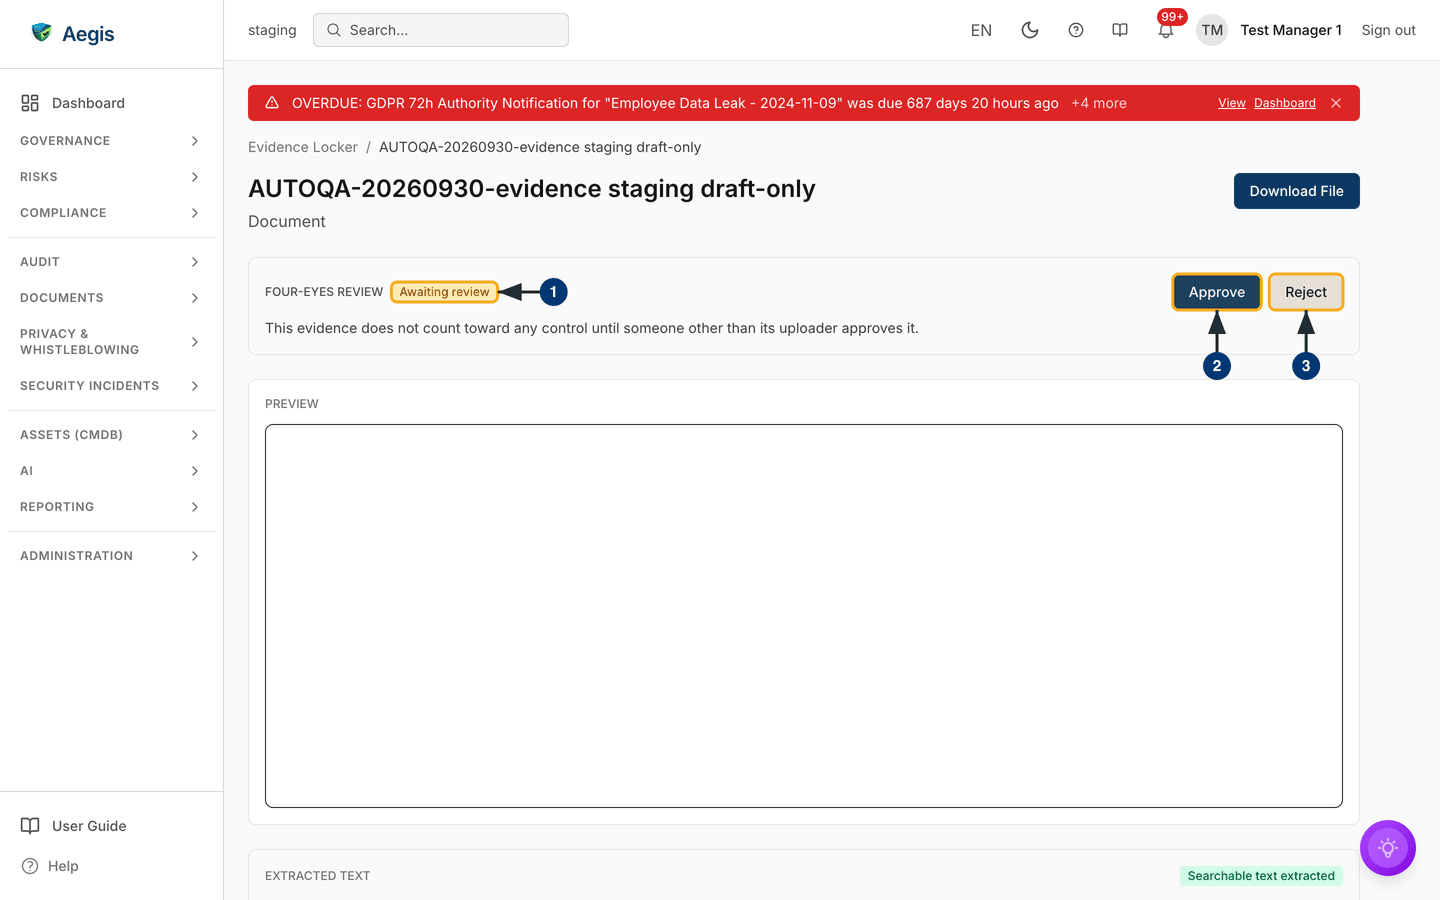
Open an item that shows Awaiting review. The
Four-eyes review panel sits under the header. It explains that the
evidence does not count towards any control until someone other than its
uploader approves it. The header has a Download File button, and
the Preview and Extracted Text panels follow below.
-
Check the review badge. If it reads
Awaiting reviewand you did not upload the item,ApproveandRejectappear beside it. If you did upload it, the buttons do not appear. -
Read the file in the preview, then select
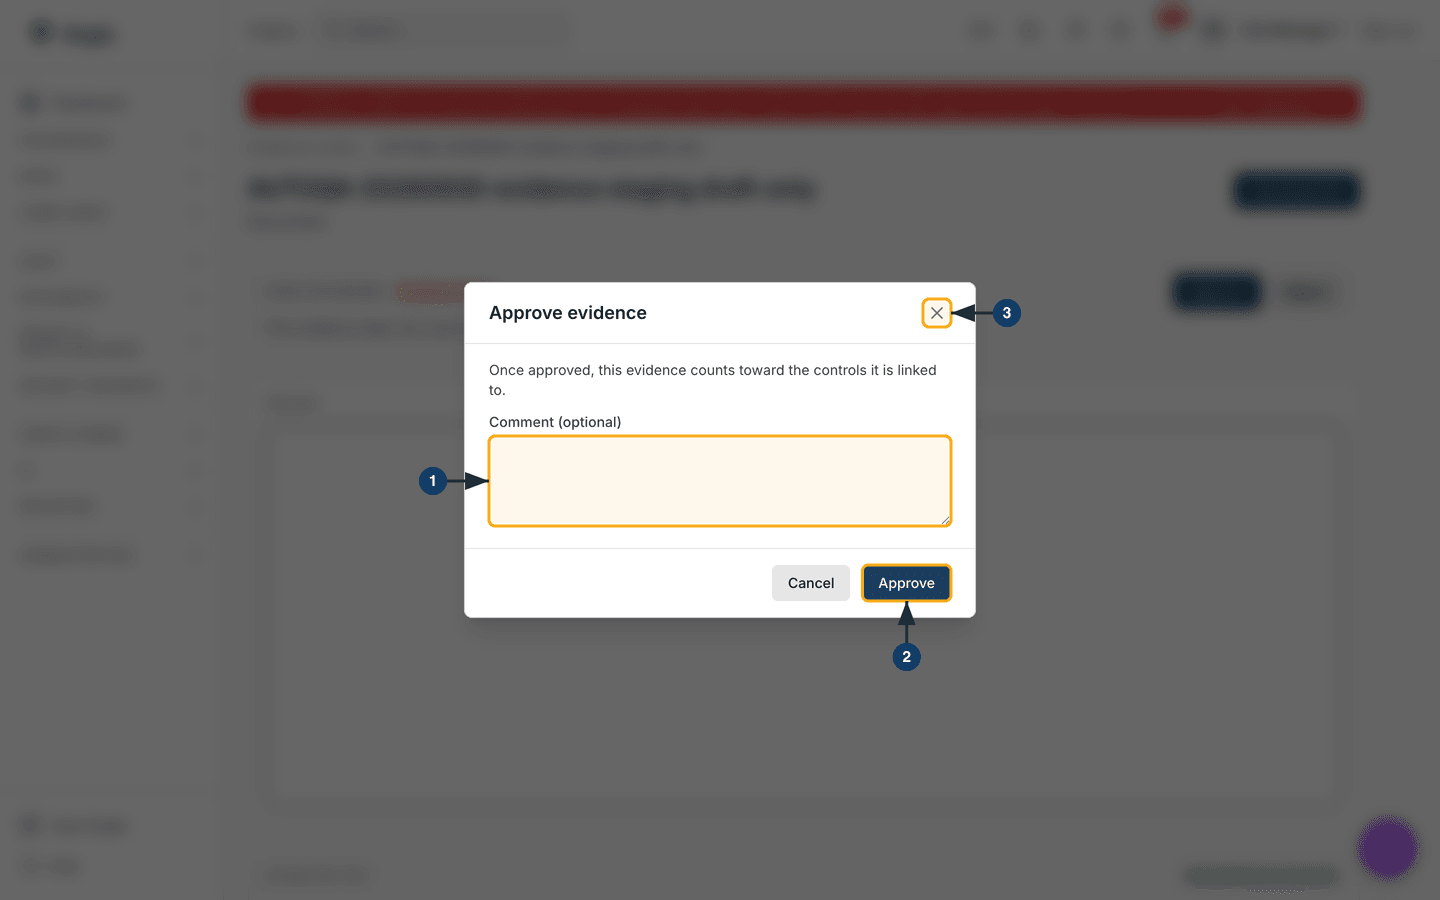
Approve. TheApprove evidencedialog opens. -
Or select
Reject. TheReject evidencedialog opens and asks for a reason.
-
Add a note in
Comment (optional). When you reject, this field becomesReason (required)and you must fill it in. -
Select
Approve. A confirmation appears and the badge changes toApproved. The panel now showsReviewed by,Reviewed onand your note. From now on, the evidence counts towards its linked controls. -
To leave the item undecided, select
Cancelor×.
Rejected evidence stays in the locker with your reason and never counts towards a control; the uploader adds a corrected file as a new item. If a message says the evidence was already reviewed, someone decided first, so reload the page.
Replacing approved evidence with a new version
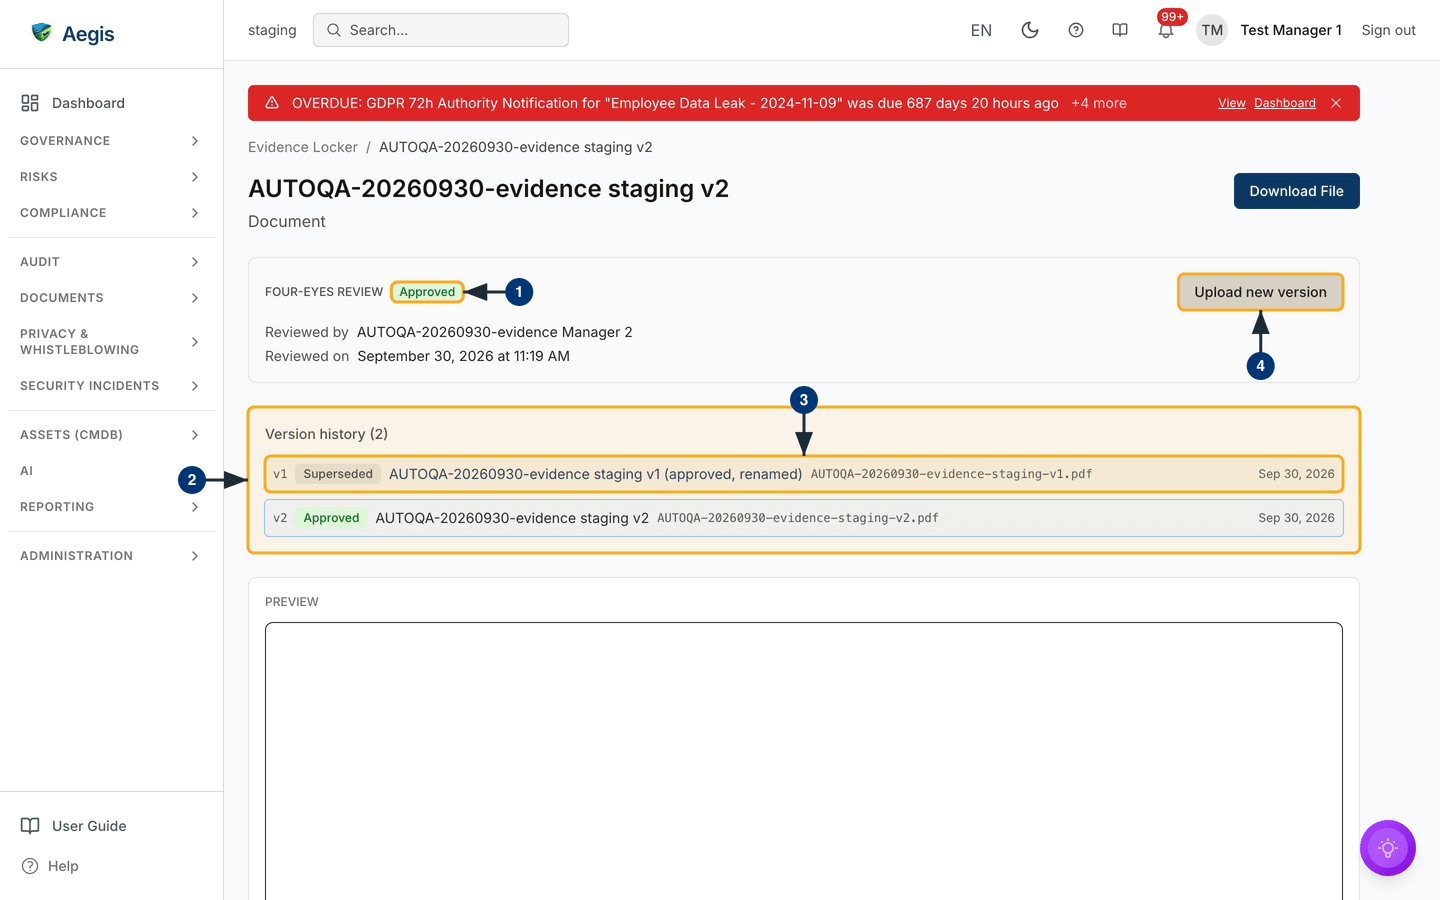
-
Open an
Approveditem. The review panel shows who approved it and when. -
Read
Version history, which appears once an item has more than one version. It lists every version with its badge, file name and date, and highlights the version you are viewing. - Select an older version's name to open it. Superseded versions stay readable, but they no longer count towards any control.
-
Select
Upload new version. The upload dialog opens again, set up to create a new version.
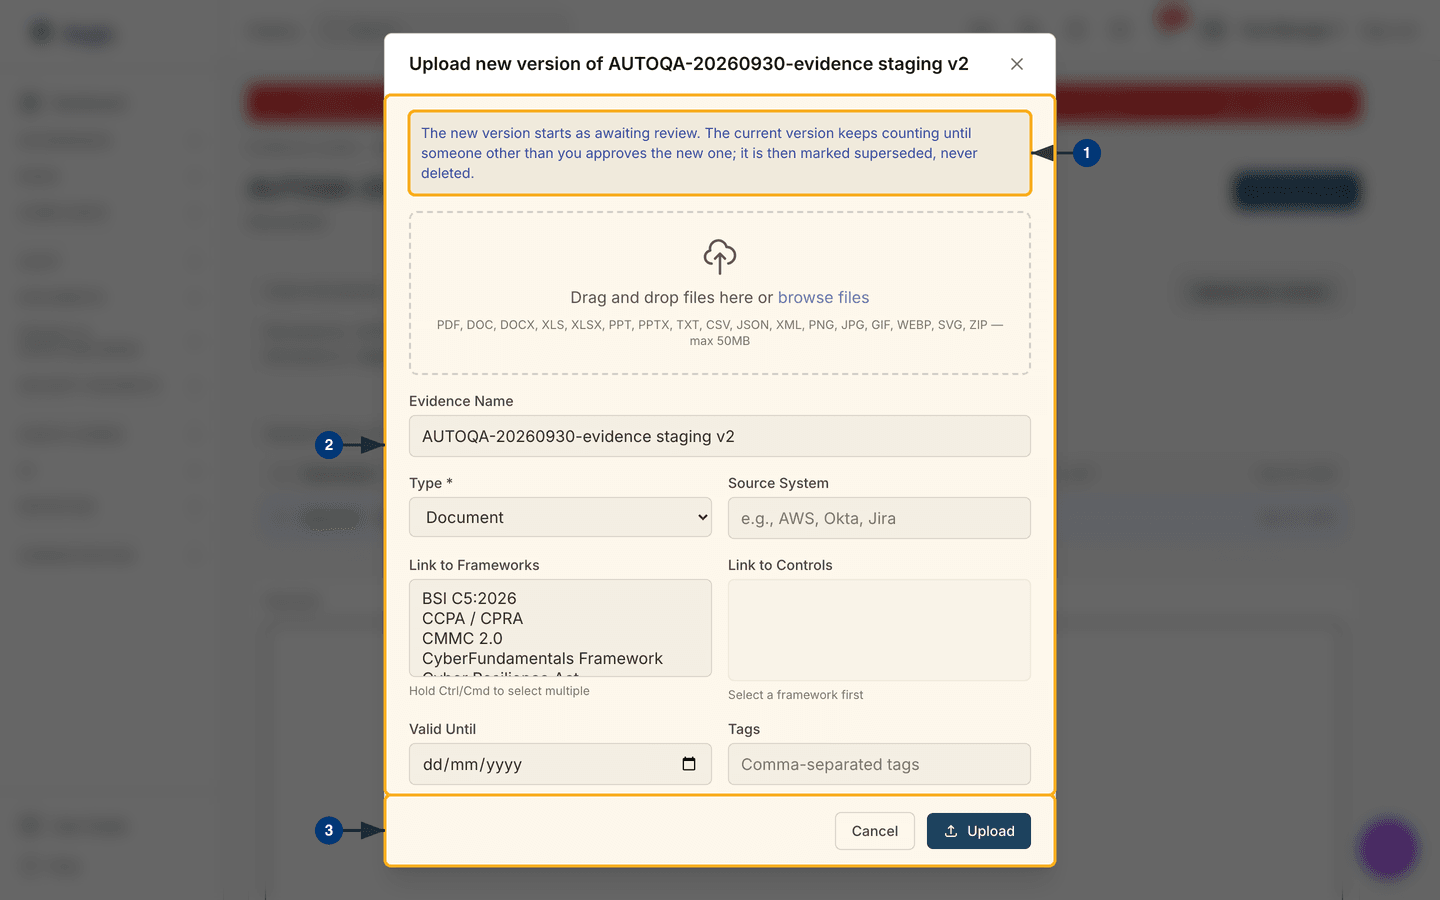
- Read the blue note. The new version starts as awaiting review. The current version keeps counting until someone other than you approves the new one, and only then is it marked superseded. It is never deleted.
- Drop the replacement file. You can add only one file here. The name and type are filled in from the current version.
-
Select
Upload. The new version joins the version history asAwaiting review. Until a reviewer decides on it,Upload new versionstays hidden.
The rest of the detail page
Further down:
-
File Information: the file's SHA-256, with aVerify Integritybutton that re-reads the file and reportsChecksum matchesor a failure. -
OwnershipandDates, includingValid Until. Tags, if any.- The controls, policies and risks this evidence is linked to.
Link existing items with Link to Control in the list's bulk bar;
remove a link from the control in
Compliance frameworks.
Checking that evidence keeps arriving
Collection Rules opens /evidence/collection-rules. A
rule never creates evidence; on your schedule it checks that a source has
delivered something since the last check. A miss records FAILED and
turns the rule's Status to ERROR.
-
Select
Collection Rules, thenNew rule. A form appears. -
Enter a name and the
Evidence type. Choose aSource system(optionally a connector), aFrequencyand aRule owner, then save. -
Use
Pause,EditorDeleteto manage the rule. Deleting a rule stops the checks but keeps all the evidence the source delivered.
The AI assist
The three AI helpers are read-only. They describe and suggest, and a person decides.
-
Evidence Gaps (AI)lists controls in your enabled frameworks that have no linked evidence, and suggests a collection plan. -
Refresh Triage (AI)ranks your evidence by expiry and staleness, and suggests what to renew first. Saved briefings appear below the table and can become action items. -
AI Classifysuggests a category with a confidence level. The item's type changes only if you accept the suggestion.
Tips and limits
-
Aegis does not chase expiries. It sends no reminders as
Valid Untilapproaches. RunRefresh Triage (AI)or set up an alert in Workflows. - The preview works for PDFs and common images. Download other file types to read them.
-
Bulk
Exportgives you a CSV of item details, not the files themselves.
Where this connects
Approved evidence proves the controls in Compliance frameworks, which are watched in Control monitoring and mapped in Control mapping. Evidence also supports risks, policies and vendors. Before an assessment, see Audit readiness and the external audit walkthrough.